

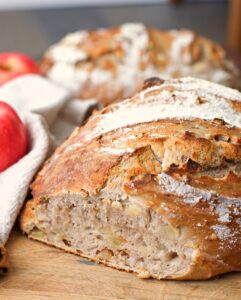

If you haven’t tried to make bread but want to try, I’ve got the perfect bread for you. What if you could make bread with just a mixing bowl and a spoon? No kneading or special mixer is necessary! If you would love that then this apple cinnamon bread is the one. It’s perfect for fall too with bits of apple, walnuts, and cinnamon!


Making apple cinnamon bread | Artisan Bread
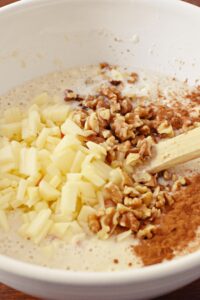
If you have never made bread before, I’ve been there. No one wants to put time into making bread from scratch if it’s just going to fail. What if I told you it takes 5 minutes to mix up? It’s hard to believe but totally true! It’s a great first bread to try. All you need to start is warm water, yeast, salt, and flour. For this bread, I mixed in chopped apples, walnuts, cinnamon, and a touch of sweetness. I like to add half of the flour before mixing in the add-ins. I think this helps everything get distributed evenly throughout. This turns this perfect Artisan bread into a delicious fall treat. Next, mix in the rest of the flour, cover with a dishtowel or press-n-seal, and set it aside. I like to set it in a warm part of the kitchen. The rising time may depend on the temperature of your kitchen and which season it is.

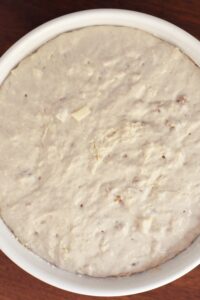
Once the bread has doubled in size you can pop it into the fridge for an hour or two or overnight. This step isn’t crucial for the bread to “turn out” but it will make the bread so much easier to work with! Warmer dough seems to bake up with wider shorter loaves and cold dough more taller loaves. You can also keep this dough in the fridge for up to 2 weeks. This works great for people with smaller families who want to bake one loaf at a time.

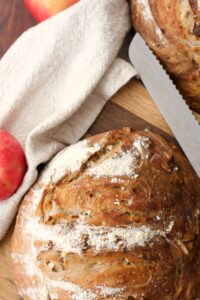
Ready to bake!
Preheat the oven to 450, and on the lower rack of your oven put a cookie sheet or metal baking pan with cooking spray, butter, or coconut oil grease a cookie sheet. Pull the bread dough out of the refrigerator and uncover it. Run your hands under warm water ( this will help avoid getting dough stuck to your hands) and pull out half of the dough. Pull the dough down and around to the bottom while rotating it until you have a nice round loaf that is smooth on top. Repeat this step with the other half of the dough or cover it and save it for another day. I like to bake up both loaves. Most of the time we eat both loaves, but sometimes we like to gift a loaf to a neighbor, family, or friend. Everyone loves a fresh loaf of baked bread!
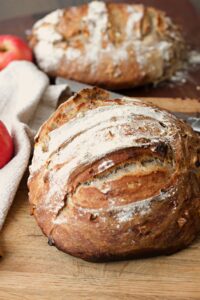

Place on your greased cookie sheet. Dust the tops of each loaf with a little flour. With a serrated knife score diagonally three times across the top of the loaf, this rustic look will make you feel proud when you pull it out!

Let it rise for a few minutes (maybe 15-20) before it goes into the oven.
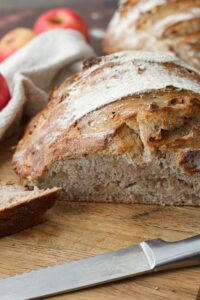
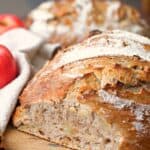
Remember that pan you put on the lower rack? Put your bread in the oven then pour about 1 cup of water on that pan and close the oven door. Bake the bread for about 35 minutes, pull it out then it’s finished! It’s going to feel super hard as soon as you pull it out. No worries! It will get softer as it cools!
Now it’s ready to eat, but wait! Always wait a few minutes for the bread to cool down a bit before cutting into it. Cutting into bread that you just pulled out of the oven is really hard. Just give it a few minutes then cut it with a good serrated bread knife. Lastly, spread some butter on and eat up!
How to store Artisan bread
Storing your homemade Artisan bread is easy. I like to buy the plastic bread bags that you can find in most grocery stores. After your bread cool completely you can put each loaf in a bread bag and tie it up with a twisty tie.
Do not refrigerate your bread. This bread is going to do best out on the counter in a bread bag or box. Refrigerating your bread will cause it to dry out and taste stale.
Freezing the bread is also an option. Wrap and bag the bread after it cools and you can freeze it for up to 2 months.
To find more recipes like this apple cinnamon bread check out this super easy Crusty artisan bread

Apple Cinnamon Bread
Ingredients
- 3 cups warm water
- 2 packages rapid rise yeast
- ⅓ cup sugar
- 1 tablespoon + 1 teaspoon pink salt or sea salt
- 6 ½-7 cups unbleached all-purpose flour or bread flour
- 1 ½ cups chopped (small) and peeled apples about 2 large apples
- 1 cups chopped (small) walnuts
- 3 teaspoon cinnamon
Instructions
- In a large mixing bowl place 3 cups of warm water, salt, and then mix in the sugar and sprinkle yeast evenly on the water and mix in with a wooden spoon. Let set a couple of minutes to let the yeast activate.
- While yeast is activating peel and chop apples and walnuts if they need chopped and set aside.
- Mix in ½ the flour then mix in apples, walnuts, and cinnamon. Mix well until everything is incorporated then add in the rest of the flour.
- Cover with a dish towel or press and seal and let it set in a warm spot in your kitchen until doubled in size and bubbly on top and starts to fall. (This timing will vary depending on the temperature of your kitchen.)
- Once it has risen, place into the refrigerator for an hour or until you are ready to bake. (This isn't required, but will this will make the dough easier to work with.)
- Preheat the oven to 450.
- Place an empty broiler tray or baking dish on the bottom of the oven (no glass) for holding water while the bread is baking.
- Prepare a cookie sheet by spraying with no-stick spray or brushing with coconut oil. Pull dough from the refrigerator, run your hands under warm water, and pull out half of the dough into your hands. Shape dough into a circle by gently stretching the dough around to the bottom on all four sides.
- Place onto a cookie sheet and repeat with the other half of the dough.
- Sprinkle about a teaspoon of flour on the top of each loaf and with a serrated knife make 3 diagonal scores on the top of the bread.
- Let rise for up to 30 minutes.
- Put the loaves in the oven then pour about a cup of water onto the bottom tray. Close the oven door quickly to trap in the steam.
- Bake around 35 minutes or until the loaves are medium brown.
- Remove bread from the oven to cool. The bread will feel really hard when you remove it, as it cools it will get softer.
Notes

